Hello hello! So, I haven’t been around for a while. We moved house a while ago, and life has been rather busy since then, so there hasn’t been all that much time for crocheting. As a result, I have decided to stop posting on this blog and instead move on to just posting on my main blog: The Dragon Writer. The old patterns and posts will stay here, but I won’t be posting any new content on this site. So yeah. If you want to, you can go and follow that blog instead. Bye! 🙂
Finished Objects: The Days are Getting Colder…
Sorry it’s been so long. I’ve been meaning to write this post for ages and haven’t had time until just now. So anyway, here’s a selection of stuff I’ve made since my last Finished Objects post. 🙂
First we have a little fox. Foxes are probably my favourite British wild mammal.
Then we have a couple of characters from a story I’m writing with a bunch of other people on Ravelry. Left is Lauren, who can control and communicate with animals, and next to her is Tahken, her brother (although neither of them know that at the beginning of the story), who is a villain :O but he will turn good at some point. You can find a pattern for their outfits (minus Lauren’s scarf and Tahken’s sword) here.
Now we get on to the cold related things. We have a little white cat for snuggling up with on the sofa when it’s cold. 🙂
And some Disney-inspired hats I made, Elsa hat on the left and Rapunzel on the right.
Then Urchin and Sepia from The Mistmantle Chronicles. I love that series. 🙂 These guys have been hibernating for a long time, with me working on them between projects, but they finally got done!
Then some fingerless gloves I made for myself because my hands where freezing!
And finally we have a little cat called Lola, who is all wrapped up for the cold October weather.
Finished Objects: Sunburst the Light Dragonet and Others.
Well, sorry it’s been so long since my last post, but first we were moving, and then there wasn’t much I could show you, and then I really wanted to finish my dragon before posting anything. Anyway, here we are! Continue reading
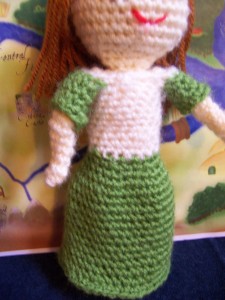
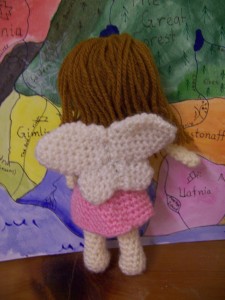
Ami Dress Up Dolls: Fairy Outfit
Ami Dress Up Dolls: Fairy Outfit
You will need:
~ An Ami Dress Up Doll Ami Dress Up Doll
~ DK yarn in three colours: Bodice Colour (green), Skirt Colour (pink), and Wing Colour (white)
~ 3.5mm crochet hook
~ yarn needle
~ scissors
Abbreviations:
sc – single crochet
mr – magic ring
sc2tog – decrease
slst – slip stitch
sk – skip
ch – chain
F/O – finish off
rep. – repeat
Rnd – round
Dress
Bodice
Using the Bodice Colour, ch 18, slst in first chain to join, making sure you don’t twist the chain.
Rnd 1: 1sc in each ch & slst (18)
Rnds 2 – 8: 1sc in each st around (18)
Rnd 9: [1sc in next 5sts, ch6, sk 3sts, sc in 4th st] rep. (12sc, 12ch)
F/O, weave in ends.
Skirt
Turn bodice upside down.
Using Skirt Colour, sc in the under side of each starting chain. (18)
Rnd 1: 1sc in next 2sts, 2sc in next st around (24)
Rnd 2: 1sc in next 3sts, 2sc in next st around (30)
Rnd 3: 1sc in next 4sts, 2sc in next st around (36)
Rnds 4 – 7: 1sc in each st around (36)
F/O, weave in ends.
Wings
Upper Wing (make 2)
Rnd 1: using Wing Colour, 6sc in mr. (6)
Rnd 2: 1sc in next 2sts, 2sc in next st around (8)
Rnd 3: 1sc in next 3sts, 2sc in next st around (10)
Rnd 4: 1sc in next 4sts, 2sc in next st around (12)
Rnd 5: 1sc in next 5sts, 2sc in next st around (14)
Rnds 6 – 8: 1sc in each st around (14)
Rnd 9: 1sc in next 5sts, sc2tog rep. (12)
Rnd 10: 1sc in each st around (12)
Rnd 11: 1sc in next 4sts, sc2tog rep. (10)
F/O, flatten and put to one side. Do not stuff.
Lower Wing (make 2)
Rnd 1: using Wing Colour, 6sc in mr. (6)
Rnd 2: 2sc in each st around (12)
Rnd 3: 1sc in each st around (12)
Rnd 4: 1sc in next 4sts, sc2tog rep. (10)
Rnd 5: 1sc in next 3sts, sc2tog rep. (8)
Rnd 6: 1sc in each st around (8)
F/O leaving a long tail for sewing. Sew edges of one Upper Wing and one Lower Wing together to create one Wing.
Sew Wings together, then sew to centre back of bodice.
Embroider features and attach hair according to taste (if you have not already done this), and put dress on your Ami Dress Up Doll, then you have your very own fairy doll!
This is an original pattern. You may give this pattern to your friends or family as a gift, and you may sell the finished object, but please do NOT sell the pattern, as it is a lot of work to create and I would like it to be available for free at all times. If you sell the dolls you make using it, please provide a link to the original pattern. If you have any questions about the pattern, please ask here or on Ravelry (purpleDragon57)
Ami Dress Up Doll
Ami Dress Up Doll
This charming little doll can be dressed up in lots of different outfits (available separately), and you can make a whole collection of them to keep or give to your friends and relatives. Finished doll stands about 18cm tall when done. Note: Fairy outfit available separately here. Work in continuous rounds unless told otherwise.
You Will Need:
~ DK yarn in any skin colour
~ 2 safety eyes with shanks
~ 3.5mm crochet hook
~ yarn needle
~ scissors
Abbreviations:
sc – single crochet
mr – magic ring
sc2tog – decrease
slst – slip stitch
F/O – finish off
rep. – repeat
Rnd – round
Legs (make 2)
Rnd 1: 6sc in mr (6)
Rnd 2: 2sc in each st around (12)
Rnd 3: 1 sc in first 5 sts, 2sc in next 2 sts, 1sc in last 5 sts (14)
Rnd 4: 1sc in each st around (14)
Rnd 5: 1sc in next 3sts, sc2tog 4 times, 1sc in last 3sts (10)
Rnd 6: 1sc in next 3sts sc2tog twice, 1sc in last 3sts (8)
stuff foot. Continue to stuff leg as you go.
Rnds 7 – 16: 1sc in each st around (8)
On first Leg: F/O and put to one side.
On second Leg: 1sc in next st, slst in 2nd st to the right of the F/O on the first Leg. Sc in next 7sts of first Leg, sc in the stitch one to the left of the join, sc in last 7sts on second Leg. There should be 17sts now. (this counts as round 17)
Rnd 18: 2sc in first st, 1sc in remaining 16sts (18)
Rnds 19 – 27: 1sc in each st around (18)
Rnd 28: 1sc in next st, sc2tog, rep. Till end (12)
F/O and stuff body.
Head
Rnd 1: 6sc in mr (6)
Rnd 2: 2sc in each st around (12)
Rnd 3: 1sc in next st, 2sc in next st around (18)
Rnd 4: 1sc in next 2 sts, 2sc in next st around (24)
Rnd 5: 1sc in next 3sts, 2sc in next st around (30)
Rnds 6 – 11: 1sc in each st around (30)
Rnd 12: 1sc in next 3sts, sc2tog, rep. Till end (24)
Rnd 13: 1sc in next 2sts, sc2tog, rep. Till end (18)
Rnd 14: 1sc in next st, sc2tog, rep. Till end (12)
insert safety eyes between Rnds 7 & 8, about 5 sts apart. Stuff head.
Rnd 15: 1sc in each st around (12)
F/O, leaving a long tail for sewing. If needed, add a little more stuffing.
Sew head to body. Sew up any small holes between the legs.
Arms (make 2)
Rnd 1: 6sc in mr (6)
Rnds 2 – 14: 1sc in each st around (6)
F/O leaving a long tail for sewing. Do not stuff. Attach to body.
Your doll is done! Now you can add features and make some clothes for it:
Fairy Outfit Medieval Hero Outfit Medieval Heroine Outfit
This is an original pattern. You may give this pattern to your friends or family as a gift, and you may sell the finished doll, but please do NOT sell the pattern, as it is a lot of work to create and I would like it to be available for free at all times. If you sell the dolls you make using it, please provide a link to the original pattern. If you have any questions about the pattern, please ask here or on Ravelry (purpleDragon57)
Finished Objects: A Whole Load of Yellow
Hi evvybody! I came back from a two-weeks-and-a-bit holiday in Hungary. Not so very much crocheting happened while I was there, and about half of it was for a secret swap, so I can’t show you those. But here’s what I can show:
First up, a couple of little yellow ducks I made to leave in Hungary for the Little Yellow Duck Project. (See my post, Finished Objects: Little Yellow Ducks and More, for more info on that.)
First up, we have Boglarka. On the side of the tag that’s visible in the photo is a Hungarian label translated by a friend of my sister’s. The other side has a German label, due to the large amount of German tourists that visit the village where we stayed. This duckie made it onto the map, adding Hungary to the list of countries where ducks have been found! 😀
Then we have Maudie, a duck I made by combining a bunch of duck patterns I’ve used in the past and adding a hat.
Then we have a reindeer I finished while on holiday. I named him Lemony Snicket, partly because of his colour, and mostly because I thought it was funny.
So that’s all I can show you just now. When the swap package arrives, I can hopefully show you some photos of the stuff I made for it.
Finished objects: Ninja and Panda
Okay, hardly anything has been finished since I last posted (I started a lot of things and then changed my mind, and now I’m doing another secret swap) but I’m going on Holiday tomorrow so I thought I’d better post so you knew I wasn’t dead 😛
First up we have this Ninja I made for my brother. He’s hiding out in the trees, looking for danger to protect us from.
Then we have a fat panda I made using a pattern that a very nice person on Ravelry gifted to me. I have named him Po after the main character from the Kungfu Panda films by DreamWorks animation studios. Yes, that is a picture of himself behind him. The first picture turned out fuzzy when I uploaded it to my computer and I couldn’t be bothered to set up the scenery again so I just took a photo there.
So anyway, that’s it for now, like I said it wasn’t much. Hopefully there’ll be more next time (in about two weeks!).
Finished Objects: Mouse, Cat, Dragon
Okay, I haven’t posted in a while, because I’ve been doing a few big projects and there hasn’t been much to show. I’m happy to say that I FINALLY managed to get safety eyes last week! (Yay!) So I can actually make what I want to make!
First off we have a yellow mouse I made with some yarn I got from a swap package! (you may remember me mentioning this swap a while ago) It’s nice and big, I think eight inches or something (?) It’s a girl, by the way, but she doesn’t have a name. Any suggestions?
Anyway, then I made this Amineko for my little sister’s birthday. She found out about it before it was even done, so she ended up getting it early 😀 It’s my fourth Amineko and counting.
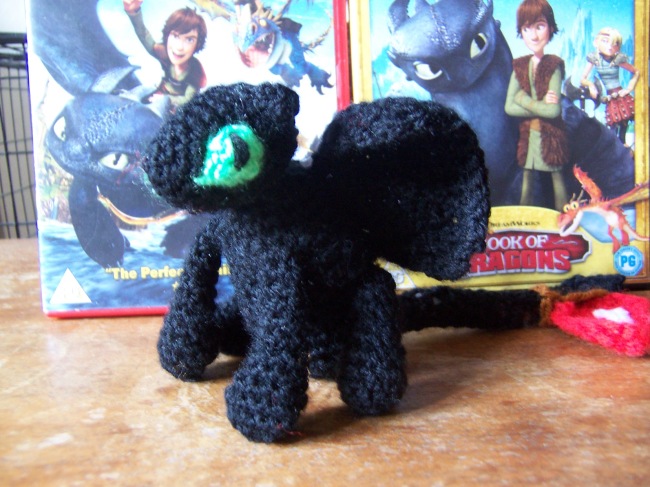
And now we have… Toothless! For those of you who don’t know, Toothless is the dragon featured in the How to Train Your Dragon films. He is very awesome, and adorable at the same time. 😀 Of course, there is also a dragon called Toothless in the HTTYD books, but he’s very different from the one in the films.
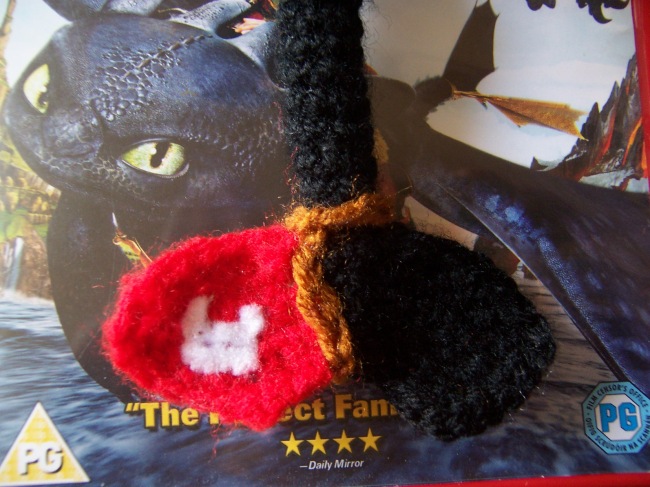
This is a close up of his tail, with the artificial tail fin Hiccup made for him. (actually, Gobber made this one, but it’s Hiccup’s design so whatever)
So anyway, that’s it for now. Have a nice day!


